Expanded (production) parts list
Description
This module is used to process order-specific production parts lists. These are the bills of materials which are generated by the system by exploding master bills of materials, taking into account the characteristics and their values specified from a customer order, warehouse order or advance requirement. The term "explosion" refers to the selection of entries from, for example, variant parts list items or the calculation of quantities and/or characteristic values.
As a special feature it should be noted that in the so-called tree view of the parts list, the calculated total quantity is displayed for each parts list entry, although only individual quantities are entered. If you change a quantity on any level in the parts list, all quantities on the levels below are automatically updated, i.e. multiplied out and the required total quantities are displayed.
Normally, ClassiX® assumes that at least a "rough" variant bill of material is defined for each part in the system. This avoids having to define and enter a separate master bill of material for each special case in advance. Within the scope of technical processing and design, this order-specific exploded production bill of materials is then adapted or designed more precisely with regard to parts, characteristic values and quantities. The changes are then only valid for the respective order item.
To quickly create new parts lists, it is possible to drag a part from the parts master into the production parts list structure using the mouse. This way only the quantity needs to be adjusted and if necessary the new item needs to be exploded (if it is an assembly - red gear symbol!).
In principle, however, it is also possible to completely redefine the order-specific production parts list.
Note: If, for example, within an order-specific production bill of materials - which was exploded or generated from a "standard" bill of materials - somewhere on a lower structural level, one part is exchanged for another part, then this production bill of materials no longer "matches" the original "standard" bill of materials. Basically, this is then also a completely new assembly, in general terms, all higher-level parts have been redefined as a result - although they still have their original part number in this production bill of materials. This procedure should therefore only be used in order to be able to quickly and pragmatically comply with any customer request for (simple) "exotic" parts (e.g. exchanging the screws for other screw heads).
As the production parts lists are retained in the system, it is always possible to trace what has been installed where: However, the order itself must always be queried in the system.
It is therefore recommended to make changes to production BOMs only for variant parts (the "uniqueness" of the BOM is anyway only ensured by the characteristic values defined in the order) and possibly to mark a characteristic of such parts with a version.
Attention:
Due to changes in the production bill of materials, it can happen that the routing of the parent part no longer matches the current production bill of materials. In order to be able to find out these items, there is an item"Display number of entries (production bill of material/master bill of material)" in the view options in the menu "Edit".
If this option is set, information is displayed after each line in the production parts list tree: (x/x). The front x represents the number of parts list entries of the exploded production parts list below this entry. The back x represents the number of parts list entries of the master parts list of this entry.
In this way, rough changes to the exploded production parts lists compared to the master parts lists can be detected.
Special work plan
On each item of the exploded production bill of material, a special routing / one-off routing can be stored which is used for the following production order. In the same way, the total time of all work sequences from this special routing later on in the parts request is the lead time with which the first scheduling is started.
So if a production part, which has a master routing over 9 days, is supplemented with a special routing of only one day, only one day is scheduled for this item later in the parts request. This means that the throughput times can be changed in advance using special work plans.
Please note: If several BOM items are grouped together for the same part in the parts request, and a special routing has been stored for only one of them, this special routing is used for all BOM items (because of the only parts request item that is created from all identical parts!)
One-time work schedule
If a routing is to be defined at the time the production bill of materials is created, a one-off routing can be created at each exploded production bill of materials item. This is a master routing that is only valid for this order and cannot be found later via the normal master search.
In order to get an overview of all routings / one-off routings for a production bill of materials, it is possible to display the routings in the tree. A toolbar button with the routing symbol above the tree is provided for this purpose.
If a one-off routing is to be extended or even created, it is sufficient to drag the workstation from the resource list to the higher-level bill of materials item with the mouse. If a master special task list was already connected to this bill of material, this connection is released and a one-time task list is created after a query. In this case the one-time task list does not open at all but only its first position with the work centre dragged into the tree. Here it only needs to be filled in and saved and then it also appears in the tree of the production parts list. By double-clicking, one-time task list items can be opened and edited directly. In order to avoid accidentally changing a global master routing, this function is only allowed for one-time routing items.
Structural assembly
A component consists of several sub-assemblies to be assembled. In the exploded parts list you can see the subassemblies to be installed under the main part.
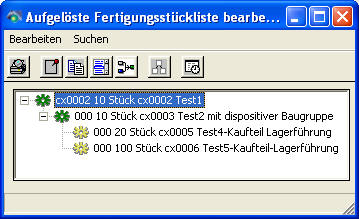
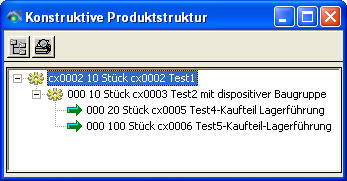
However, the production department itself would like to save the sub-steps for the assembly and scheduling of subassemblies and assemble them directly only when the main part is assembled. For these cases, the subassemblies are marked in the parts list as constructive assemblies, i.e. the design department sees these parts as subassemblies, but in the production department the subassemblies of the constructive assemblies are all assembled together without the constructive assemblies. The production department sees this parts list as shown in figure 3
The subparts of a constructive assembly located in the exploded production bill of materials are moved up one level in the production order as if the constructive assembly were not even present in the exploded bill of materials and all subparts of the constructive assembly are moved directly to the position where the constructive assembly itself is located.
Figure 1:
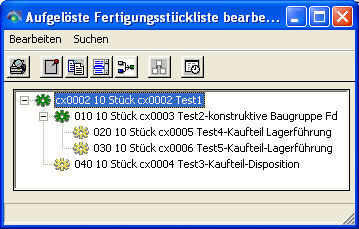
Figure 2: 
Figure 3: 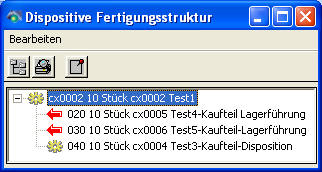
The parts Test4 and Test5 therefore move below the top level, the constructive assembly is not considered further. In this example, all parts are required on manufacturing level 1.
Disposable assembly
In the case of the disposable assemblies, one must distinguish between 2 different scenarios:
- Loose part: A part which is actually a fixed part of an assembly, but which is to be installed at another production stage.
- Purely MRP assembly: Subset of parts which belong to an assembly but are to be planned collectively. A new part is added to the production bill of materials, which is not visible in the normal production bill of materials.
If a bill of material is linked in a production role and an entry exists in the MRP product structure, the specified part is "pushed" on the entry of the MRP product structure below the production part when the production bill of material is exploded. All parts which are specified in the bill of material item list on the purely MRP assembly are therefore moved from the higher-level bill of material below the new entry.
To create a purely MRP assembly, the system starts from the production role to be inserted in between, creates a purely MRP entry there and selects the bill of material with its items from the higher-level bill of material. This purely dispositive entry is then visible both in the initial production roll and in the production roll of the intermediate part.
Attention!
A purely disposable assembly is not visible in the normal production parts list display:
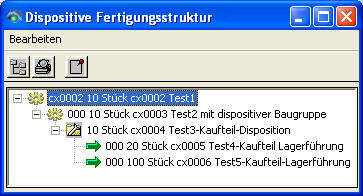
In the dispositive manufacturing structure, the purely dispositive assembly "Test3" appears in the end. For this part a part request item is also created. The parts cx0005 and cx0006 are then arranged below it.
An MRP assembly defined by the master is a production part that does not have its own bill of material and contains entries from other, higher-level bills of material in another production part in the "MRP product structure" list. (See here for technical pattern) A condition can only be entered for entries in the MRP product structure if the assembly is a purely MRP assembly.
Further information on assembly parts lists and on purely disposable assemblies
Change of already processed parts lists
An important point here is that the directly superior production order items must be reprinted after a bill of material item has been added or deleted. For this purpose there is a date on the production order item after the change and on the header, which is supposed to say that the already printed production papers have to be collected and reprinted/distributed. This date can be seen in the production order processing mask and in the worklist in the 2nd column. It disappears again after "real" printing of the production documents.
If a parts request for a parts list has already been created and further processed, the corresponding parts list entries can no longer be changed.
However, new items can be inserted under production order BOM items if the part request is not released. If the part request has already been released, the release must be cancelled.
To insert an item in the parts list, mark the parts list item under which a new item is to be inserted. In the context menu, which can be opened by right-clicking on the selected position, the entry "Insert" has to be selected. A security question will appear which must be answered with YES. Now the parts list item can be created and edited in the usual way.
All parts that are included in the production bill of materials must be exploded if there is a production bill of materials for the part, even if this item is actually only to be ordered. How the part is to be planned is set later in the part request.
If the parts list item is now complete and is to be processed further, the entry "Edit->Straggler->Extend parts request" must be selected in the main menu.
A new parts requisition item is created for each newly created parts list item (without merging with existing parts list items!!), which is planned immediately, i.e. the new parts requisition item is given its standard planning type (warehouse reservation/purchase requisition/production order) and the procurement time is determined and saved based on this. Now the item only needs to be scheduled and further processed using graphical scheduling from the parts requisition:
- If the new position is a warehouse reservation , the warehouse reservation must first be cancelled via the menu item "Edit->Delete->Reset warehouse reservation (all warehouse parts). Afterwards all parts including the new parts request item can be booked in again via the menu item "Edit->Continue processing->Make stock reservation".
- If the new item is a purchase requisition, a new requisition simply has to be created via the menu item "Edit->Continue processing->Stragglers -> Create another purchase requisition", which automatically posts the parts requisition item.
- If the new position is a production order, a new production order must also be created via the menu "Edit->Continue processing->Straggling->Create further production order". The part request item is now booked in.
After the appropriate steps have been taken, the part request must now be released at the end via the menu "Edit->Further processing->Release part request".
If a parts list item is to be deleted, this can also be done from the parts list. However, the following conditions apply:
- Part requirement release must not be set
- Parts request item the parts list item to be deleted must not have the status production order
- Production orders can no longer be changed
- All requisitions already created for the item to be deleted must be cancelled
- The stock reservation in the parts request must be cancelled if a stocked part is to be removed
- If an assigned advance requirement exists for this item, the advance requirement must be removed and, if necessary, the main MRP type must be changed.
After checking the conditions, the parts list items are deleted, as are the attached parts request items, provided they are not still needed by other parts list items.
exception:
If a cancelled successor document is already attached to the part request of the BOM item to be deleted, then both the BOM item and the part request item (if no longer required) are cancelled and displayed with a red X in the BOM.
Known change scenarios
- Order item is to be exchanged completely
- Parts list item without bottom parts is to be exchanged
- Parts list item with subparts is to be exchanged
- Bill of material item is to be deleted
- Order item to be rescheduled (not yet implemented)
- The full quantity of the parts list does not need to be planned
- Part requirement item does not need to be planned in full quantity, but has already booked successors.
Here are instructions on what exactly to do if a change is to be made:
| Nature of the change | Procedure | Alternative approach |
|---|---|---|
| Replacement of a parts list sub-item whose parts request is set to the MRP type stock reservation |
| |
| Replacement of a parts list sub-item whose parts requisition is set to MRP type purchase requisition |
|
|
| Exchange of a parts list sub-item whose parts request is set to the production order disposition type |
|
|
| Deleting a parts list item whose parts request is set to the stock reservation M RP type |
Attention: If a withdrawal has already been made for the warehouse reservation, both the parts list item and the parts request item are not deleted, but are automatically cancelled with a cancellation document. The parts request item then automatically goes into the status "stopped" because the withdrawn quantity must first be put back into storage. After putaway, the part requisition item then also automatically goes into the status "cancelled" (see also "List of changed part requisitions") | |
| Deletion of a parts list item whose parts requisition is set to MRP type purchase requisition |
Attention: If it is a parts request that has been combined from several orders, a new parts request must be created via "Further processing>Stragglers>Create further order request" before the parts request is released! Afterwards the parts request can only be released again! | |
| Changing the part to sales order item for disposable production parts after exploding the parts list and further processing the parts request |
| |
| BOM item does not need to be planned in full quantity |
|
|
| Part requirement item does not need to be planned in full quantity, but has already booked successors. |
|
Creation of an advance requirement for a part from a parts list
Via the menu "Edit>Preliminary requirements>Create preliminary requirements for part from selected item" a preliminary requirements item for the part can be created for the selected item. All required characteristics from the parts list or the order item are transferred to the advance requirement. Furthermore, the required quantity and the order as predecessor for the advance requirement header are copied. Even if a production part of a bill of material is taken over into a preliminary requirement, which still has subparts that in turn require further characteristics, these are directly taken over into the preliminary requirement item as they were set in the order or the bill of material.
If the part for preliminary planning is a production part, the production bill of materials for this item is also copied. This ensures that in the case of processed production parts lists, these changes are also transferred to the advance requirement.
Detaching of parts list nodes from the parts list into a preliminary requirement
If the customer requests changes to an order item that has already been processed, it may be necessary to change the main part on the order item. As this would change the exploded bill of material, and production orders have already been created, for example, this change can no longer be carried out.
There are now 2 options available:
- Cancel complete order item and store started part request items via the window "changed part requests" etc. Then create a new order item and start all production orders from scratch.
- Move parts of the bill of material that are also needed in the new bill of material to a preliminary requirement, then cancel the old order item, create a new order item and the preliminary requirements of the old bill of material are automatically linked when the gozintograph is created. In this way, production order sub-items can be further processed.
If you open the exploded parts list of the order item, a new menu item "Edit->Preliminary requirements" is available. It contains 2 entries: "Move selected node to advance requirement" and "Move all subitems of selected node to advance requirement".
Attention!
Constructive assemblies are dissolved! This means that when a constructive assembly is selected and the menu item "Move selected node to preliminary requirement" is chosen, not the constructive assembly itself but only its sub-items, which are not constructive assemblies themselves, are moved to a preliminary requirement.
Only one preliminary requirements header is created for a bill of material, which then contains all the sub-items created. It is possible to extend an advance requirement that already exists for this order. To do this, the existing advance requirement must be opened before the BOM items are released. The system then checks whether the order header in the opened preliminary requirement is identical to that from the BOM item to be released. If not, a new preliminary requirement is created.
If components are to be transferred from one order to another, they should not be moved via this route to an advance requirement, but should be stored temporarily, i.e. a putaway should be created for the old order and a stock removal for the new order. In this way the costs are included in the new order and at the same time the old order is credited.
Functionality
Input window
| Menu item | Description |
|---|---|
| Edit | - |
| : Entries | - |
| : : Edit | The selected parts list entry can be edited. |
| : : Insert | A new parts list entry is added to the selected parts list item. |
| : : Remove | - |
| : : : Complete | The selected BOM item is removed (deleted) together with all subordinate BOM items. If MRP has already been run for the bill of material item, it is not deleted but cancelled. A reversal document is generated. Any goods that have already been removed must then be put back into storage using the"Completion of change management" list. |
| : : : Substructures only | All subordinate parts list items are removed from the selected parts list item onwards. The selected bill of material item itself is retained. If dispositions have already run for the bill of material items, they are not deleted but cancelled. Any goods that have already been removed must then be put back into storage using the"Completion of change management" list. |
| : : Edit referenced master BOM item | The corresponding item of the master parts list is opened for editing. |
| : : Display as list | The parts list tree is displayed as a list. |
| : : : Create preliminary requirement for part from selected position | |
| : : Completely dismantle part | This is a shortcut to completely disassemble a part (see also conversion parts list / disassemble parts). This function is only available for internal orders. This can be applied to the level 0 parts. Here the level 0 part itself is added to the parts list again. The part itself must be defined as a stock-keeping production part (also manual stock, etc.), as this must be marked as a material withdrawal in the disposition for dismantling. In addition, all sub-parts of the parts list are inserted into the production parts list and marked as "to be dismantled". If a stage 1 part is selected because the part to be removed from stock has already been inserted, only the last step is executed. |
| : : Create customer complaint from selected item | |
| : : Dissolve | The selected parts list item is exploded. If a special BOM is specified on the BOM item, it is exploded, otherwise the standard BOM of the part is exploded. During the dissolution process, the system checks whether it is a part provided by the customer. |
| : : Expand from bill of material master | Variant part without, or with empty master parts list: Expand without master references (e.g. for unspecified variant parts) If a variant part without - or with an empty - master bill of material is entered on a bill of material item, this can be exploded using a template bill of material. All items of the sample bill of material to be selected are then appended to this item. |
| : : Test: Attribute value | Any characteristic values can be tested for the selected BOM item. This allows you to check whether a characteristic has any value at all in this item or what value this value has. (Important for exploding from this BOM item onwards). |
| : : Test: values <-> inherited values | |
| : Check parts list | Calls the function to check the parts list. |
| : Testing Gozintograph | |
| : Conversion | - |
| : : Stragglers | - |
| : : : Extend part request | |
| : : Advance requirements | - |
| : : : Move selected node in advance | The marked bill of material node is removed from the initial bill of material and attached to a newly created advance requirement item for the same order. In this way components already produced from cancelled order parts lists can be reused for other order items of the same order. See also "release in advance |
| : : : All subnodes of selected node | Not the selected item, but all its sub-items are moved to a preliminary requirement and thus removed from the initial bill of materials. |
| : : Compare parts list with other parts list | See parts list comparison |
| : Preliminary planning | |
| : : : Create preliminary requirement for part from selected position | An advance requirement is created for the selected part without moving the BOM item. If this is a production part, the production parts list of this item is also copied. This ensures that in the case of processed production parts lists, these changes are also transferred to the advance requirements. |
| : : Compare parts list with other parts list | Opens the parts list comparison window, in which exploded parts lists can be compared with each other |
| : Import ELCAD parts list | The parts list items exported from an ELCAD to Excel are imported (inserted) to the parts list item previously selected in the tree. The Excel file is interrogated interactively; likewise, it must be confirmed for security that you want to insert the ELCAD items exactly at the selected parts list item. |
| : Comparison Import ELCAD Parts List | Via this function it is possible to compare an already imported ELCAD parts list with a new version of this list before the actual import. For this purpose, the superordinate node under which the ELCAD parts list has already been imported is marked and this menu item is selected. A file dialogue appears in which the new ELCAD Excel file must be selected. After the selection, the ELCAD parts list is only read in the working memory and the parts list comparison mask opens in which the old version of the ELCAD parts list structure is displayed on the left side of the window and the newly read-in version on the right side. In the result list below both parts lists you can see the differences. The result can also be displayed clearly as a tree structure by clicking the button "Analysis as tree". During this comparison, only the new and omitted parts list items are automatically displayed in the result list. See also parts list comparison |
| : Display options | |
| : : Display number of entries | The last column in the tree is now a value (x/x) which shows the current number of positions below the selected node. This value consists of 2 numbers: First those of the exploded production bill of material, then those of the master bill of material. If the quantity in front of the "/" differs strongly from the quantity behind it, (31/2), then the work plan of this position should be checked. This will then certainly no longer match the exploded production bill of materials. The routing can only be changed once it has been exploded from the production order. |
| : : Display work plans | The work sequences of the work plans of the positions are also displayed in the tree. Sequences of standard routings are marked with the symbol If special or one-off routings exist, they are displayed instead of the standard routings. See the section on one-off routings for more information on the possibilities using Drag&Drop |
| : Preliminary costing | - |
| : : Calculate | not released |
| : : Display | not released |
| Close | Close window |
| Search | Call up the selection window |
| Symbol | Description |
|---|---|
| Output of the print preview window. | |
| Create/edit notes | |
| Call up the copy buffer The copy buffer window opens in order to insert selected parts list items by drag & drop. From this copy buffer, these parts list items can then also be inserted again into the parts list tree by drag & drop, whereby a copy is automatically created. | |
| Display parts list in list form | |
| Show available product structure | |
| Display document history The document history is displayed for a selected BOM item. | |
| Create time sheet The timesheet mask is opened and automatically prefilled with the employee and the predecessors, in this case the parts list. | |
| The tree is displayed sorted by the numbers of the subitems. By clicking on this button the display will be shown unsorted. | |
| Create spare parts enquiry This button opens the module for the automatic creation of requests, the selected parts list position is transferred to the module. With this tool it is possible to automatically generate spare parts enquiries. | |
| Creation of a packing list as successor if a parts list item is to be delivered directly to the construction site. |
In the tree view, the parts list items can be moved freely in the parts list structure as long as they have not yet been further processed.
Exceptions are order and stock parts: Sub-items of them cannot be shifted, as they are only in stock or can be ordered with their original parts list.
If a part has already been moved once, the original parent position is saved to it. This means that it can also be extracted from parts lists of ordered and stock parts, for example if they have been moved here by mistake.
If a part cannot be moved successfully, the reason is displayed on the status bar of the window.
Care window
In this window the entries of a production bill of materials are maintained. In particular, it is possible to exchange the part and/or its bill of material, to make entries for the MRP structure and to make quantity adjustments.
On the uppermost bill of material node, a check is carried out to ensure that the bill of material quantity matches the quantity of the predecessor order.
Attribute maintenance
In addition to the 'normal' options for inserting, creating or removing attributes, further functions are available in the maintenance window of the parts list items.
| Apply - All | This function takes over all attributes of the part, provided it is a variant part. No attempt is made to assign a value to the attribute which is determined from the production bill of materials or the preceding document. To avoid differences, the values should be 'updated' (see menu item "Update" below). |
| Apply - Dynamic | This function takes over the attributes of a variant part, which have not already been defined by the production bill of material or the preceding document anyway. |
| Update | This function updates the attribute values. A prerequisite is that the attribute has been defined in the production bill of material or the preceding document. It is recommended to use this function to avoid differences between two attribute values. |
| Test: Value <-> Inherited values | This function is the preview for the update, so to speak. It shows the differences between the attribute values of the item and the actual values to be inherited. |
Note:
In a production bill of materials, the attributes do not refer to the same attributes at a higher level, as is the case in the order. Therefore, it should be avoided to insert attributes that are already defined in the production BOM or the preceding document.
Serial numbers
Here the serial numbers are displayed, which were used in the parts list items. Especially the serial numbers which were assigned by the supplier have to be entered here, as these parts do not appear in any production order. The following menu items are used to edit the serial numbers via the parts list:
| Insert | A serial number label can be selected via the selection mask. |
| Manual recording | New serial numbers are entered via the editing mask of the serial number labels. The part of the parts list item and the item itself are transferred to the editing mask, so that only the serial number has to be entered here. |
| Remove | Removes the serial number label from the bill of material item. |
| Enter serial number for supplier | This is the most effective method of recording suppliers' serial numbers for a BOM item. The first step is to select the supplier by clicking the appropriate button. When opening the supplier selection mask, all suppliers are displayed with whom the part has already been ordered from ClassiX®, but other suppliers can also be selected. The next step is to enter the serial number in the corresponding field. After triggering, the serial number is created directly, displayed as an object in the corresponding field and the input field is reset. So now the next number can be entered directly if the item consists of more than one piece. |
| Menu item | Description |
|---|---|
| Edit | - |
| : Insert part | - |
| : : Via selection mask | |
| : : About advance requirements | |
| : Quantity correction | - |
| : : Insert | |
| : : Delete | |
| : Serial numbers | - |
| : : Insert | A serial number label can be selected via the selection mask. |
| : : Manual detection | New serial numbers are entered via the editing mask of the serial number labels. The part of the parts list item and the item itself are transferred to the editing mask, so that only the serial number has to be entered here. |
| : : Remove | Removes the serial number label from the bill of material item. |
| Attributes | - |
| : : Copy characteristics | - |
| : : : All | This function takes over all attributes of the part, provided it is a variant part. No attempt is made to assign a value to the attribute which is determined from the production bill of materials or the preceding document. To avoid differences, the values should be 'updated'. |
| : : : Dynamic | This function takes over the attributes of a variant part, which have not already been defined by the production bill of material or the preceding document anyway. |
| : : : Update attribute values | This function updates the attribute values. A prerequisite is that the attribute has been defined in the production bill of material or the preceding document. It is recommended to use this function to avoid differences between two attribute values. |
| : : Test: values <-> inherited values | This function is the preview for the update, so to speak. It shows the differences between the attribute values of the item and the actual values to be inherited. |
| Close | Close window |
| Field | Description |
|---|---|
| Number | |
| Part | Selected part |
| Index | Version of the parts list. This index is written from the master BOM to the exploded BOM item when exploding production BOMs. Thus, it is later still traceable with which index (revision) the bill of material was exploded. An index can also be specified on the master bill of material items. If this is not filled in, the system checks when exploding the production BOM whether the part in the BOM item has its own BOM with index. This index is then transferred to the exploded item. |
| Disassemble part | This position is removed from an existing component and stored! See conversion parts lists |
| Standard parts list | Standard parts list of the part |
| Special parts list | Selection and display of the special parts list assigned to the parts list item. Usually, the standard bill of materials of the part is exploded and also used unchanged. However, if there are special constellations, for example, if a customer always wants a certain part to have such special features that cannot be represented by variant parts lists (as these are "too exotic"), the special parts list can be assigned to the part. A rule of thumb for the use of special parts lists is: The standard parts list is used in 80% of cases, special parts lists in 20%. If the special bill of material is used in more than 20% of cases, it makes sense to integrate the special features into the standard bill of material as a variant. Each exploded parts list can be changed later. However, the exploded parts list then deviates from the master parts list for which the corresponding routing was created. This makes the routing inaccurate, therefore serious changes in the exploded BOM must always be made in consultation with the work preparation department, so that the routing can be adjusted if necessary. |
| Standard work plan | Standard work plan of the part |
| Special work plan | Selection and display of the special work plan assigned to the parts list item. If it is a special task list that is not available in the master task lists and should not be available as a master task list either, you can create your own local task list directly. The editing of your own, local work plan is done with the right mouse button. When assigning a special task list from the master data, the symbol |
| Make part yourself | It is also possible to dissolve the parts list of the production roll for purchased parts with own provision and production rolls and to build the part yourself. For this purpose, the check mark "Make part yourself" must be placed on the exploded parts list item of the purchased part with self-supply. All sub-items that may already have been created by an automatic explosion of the bill of material provided by the supplier must first be deleted (open context menu on purchased part with own provision item, then>Remove>Substructures only). When the bill of material item is exploded again, the production bill of material is then exploded and in the Gozinto, the lower parts are not marked as parts to be provided and the purchased part with own provision is itself not planned as a purchase requisition but as a production part. |
| Spare parts list | If this check mark is set, then this parts list item is recognised as a spare part when a spare parts list is created, regardless of the master parts list item from which it was possibly generated, and is transferred there. |
| Supplying supplier | In the case of purchased parts with in-house provision, it is necessary to know from which supplier this item is ordered when exploding the parts list. This is because the supplier specified here is used to include the parts required for provision in the parts list. If this field is not filled for logistically defined purchased parts with in-house provision, the Gozintograph cannot be created and testing will result in an error message. Read more about provision suppliers on the logistics account, supplier agreement parts list and self-provision process description. |
| Available product structure | This field can be used to move the open position in the exploded production parts list below a higher production level. This may be the case if a part is supposed to be attached to a sub-assembly but, due to more practical circumstances, it could only be assembled after the entire part has been completed (because it may have a longer replenishment lead time and you still want/must start production earlier). Hence the name "dispositive" product structure. This means that one can start with the assembly of the sub-assembly without having to wait for the disposition of the long-running part. See also "MRP product structure" and"purely MRP assembly". Only a "loose" assembly can be defined in the production bill of materials, i.e. an assembly can be moved from a lower level to a higher or even lower level. Purely MRP assemblies can no longer be created in the exploded BOM, i.e. a component that is not visible in the normal exploded BOM view, but appears in production as a separate production order, can no longer be subsequently built into the exploded BOM after the explosion of a master BOM. |
| : Constructive assembly | If the assembly is marked as "constructive", it will not appear in the sub-requirement itself and all its sub-items will be placed one level higher. In the production bill of materials, you can still see the order through this assembly, but it does not exist later in production. |
| Disp. Use | |
| Quantities | - |
| : Fixed quantity | |
| : Quantity | |
| Features | Listing of attributes |
| Serial numbers | - |
| : Enter serial number | |
| : : for supplier | This is the most effective method of recording suppliers' serial numbers for a BOM item. The first step is to select the supplier by clicking the appropriate button. When opening the supplier selection mask, all suppliers are displayed with whom the part has already been ordered from ClassiX®, but other suppliers can also be selected. The next step is to enter the serial number in the corresponding field. After triggering, the serial number is created directly, displayed as an object in the corresponding field and the input field is reset. So now the next number can be entered directly if the item consists of more than one piece. |
| Note |
| button | Description |
|---|---|
| OK | Changes to the production parts list entry are saved. If no changes have been made, the button is locked. |
| Close | The window is closed without saving changes. If you want to save the changes, you must press the "OK" button. |
Selection window
In this window you can search for already exploded production parts lists.
| Field | Description |
|---|---|
| Number | Search by number |
| button | Description |
|---|---|
| OK | The selected exploded production parts list is taken over. |
| Close | The selection is cancelled. |
List window
With this window exploded production parts lists are displayed in a list form instead of a tree structure. If one selects an entry in the list with a double click, one goes directly back to the selected bill of material item in the tree structure. Right-clicking opens the maintenance window of the selected BOM item.
| Field | Description |
|---|---|
| Depth | The structure depth of the parts list to be listed can be selected. If nothing is specified, the entire bill of material structure is output |
| Display only parts lists of disposable production parts | In principle, all existing parts lists are always exploded. If, for example, a part was once an in-house production part, then it is very likely that its parts list is still available in the system. When exploding, this parts list is also taken into account - even if the part is now a purchased part. The parts lists are also exploded for production parts that are kept in stock, even if these parts are not produced to order, but are taken directly from stock. In order to filter out the parts lists of such parts, this checkbox must be ticked. Then only the parts list is displayed for those parts which - if no parts planning has been carried out yet - have been marked as production parts for planning according to the standard logistics and staging identifier in the parts master, or - if parts planning has been carried out with the possibility to overwrite the planning identifier - have been marked as production parts for planning. If this checkbox is ticked, the next checkbox "Proof of origin" appears, which is otherwise invisible. |
| Proof of origin | If the option "Expand only parts lists of disposable production parts" is set, you can still display the purchased parts for stocked production parts. This gives you a list in which all purchased parts are listed, regardless of whether they are still being used for an MRP production part or whether they have already been used in a stock-keeping production part. |
Result check of parts list
This window displays the result if the function "Check bill of material" was called up from the editing window of the production bill of material. However, the check is also carried out directly after the production parts list has been created (exploded).
The list shows the parts list items for which the check has revealed an error or warning message.
The following cases will be examined:
- There is a bill of material item without allocation to a part.
- There is a bill of material item with assignment to an invalid part without exchange object.
- The part status has the indicator "Adding to parts list prohibited" (see Attributes with control function)
- The part status has the indicator "Warning when adding to parts list" (see Attributes with control function)
Parts list comparison
With this application it is possible to compare an exploded bill of material with another exploded bill of material. The similarities and differences are displayed in the result list.
Example
The customer orders a clockwise rotating system. The order item is released, the production bill of materials is exploded and production is started. After some of the components of the system have already been completed, the customer answers, apologises and now wishes the system to rotate counterclockwise. In this concrete example, the procedure would now be that a new order item is created via the anticlockwise rotating system and its production bill of materials is exploded. The two production parts lists are then compared via the parts list comparison in order to identify the identical and the different components.
Call up the parts list comparison
There are two ways to call up the parts list comparison. On the one hand you can call up the menu item "Edit -> Conversion -> Compare parts list with other parts list" in an existing production parts list. In the example above you would do this from the parts list of the clockwise rotating plant. The parts list is then taken over as the initial parts list. If you call it up manually, an empty mask opens and the initial parts list must be selected manually via the selection mask of the order items.
The next step is to select the target parts list. This is also done via the selection mask of the order items or by drag&drop of the order item.
Finally the toolbar button "Start comparison" must be pressed to start the comparison.
Evaluation of the parts list comparison
The results of the comparison now appear in the results list in the lower part of the window. The first column in this list is the type of result:
| Result | Description |
|---|---|
| Found | Found means that the bill of material item is present in both bills of material. The items are identical with regard to the part, the characteristics and the quantities. Further processing if necessary: |
| Found (deviating attributes) | This result can only be achieved if the option "Disable attribute value comparison" has been set via the option mask. With this option the result means that the variant part was found, but the characteristics are different. In the result list, the attributes of the source BOM and the target BOM item can be compared in the following columns. |
| Found (deviating quantities) | This result means that although the BOM items were found in the source and target BOM, the quantities have changed. In the result list, the quantities of the source and target BOM items can be compared in the following columns. When comparing quantities, reference is always made to a reference quantity. Thus the quantity is always compared in relation to the quantity of the level-0 part. |
| New | Entry is present in the target parts list, but not in the source parts list |
| Not applicable | The entry was present in the original parts list, but is no longer required in the new parts list. |
| Omitted, but contains found object | The entry was present in the original parts list and is therefore no longer present. But it is still used under sub-items of the source BOM in the target BOM. |
Navigation
If a result list entry is double-clicked, the associated parts list items in both trees, if available, are marked.
So if you double-click on an entry that starts with "Found", the first occurrence of this part is displayed in both parts lists.
Via the two parts list trees, the context menu can also be used to navigate to the other parts list and to the results window. See "Menu" description below.
| Menu item | Description |
|---|---|
| Result list entries | - |
| : Move all selected items to a pre-requirement | Moves all parts lists marked in the result list from the initial parts list to a new preliminary requirement. See also "Release to Advance Requirements". |
| Open the parts list you are looking for | Opens the edit mask of the exploded parts list item of the initial parts list to which the result list entry refers. If there is none, nothing happens. |
| Open found parts list | Opens the edit mask of the exploded BOM item of the target BOM to which the result list entry refers. If there is none, nothing happens. |
| Output parts list | - |
| : Show marked position in result list | Selects the entry from the result list that matches the selected initial parts list and marks it. In this way it can be checked whether or not an entry for this item was also found in the comparison parts list. |
| : Show marked position in new result list/tree view | The marked position is displayed in an extra window with a tree view. |
| Show only direct sub-items of the selected item in the new result list | Only the parts list entries of the next lower level are displayed in an extra window in a list and in a tree view. |
| Mark found part in target parts list | If the marked part of the source parts list was also found in the target parts list, the part is also marked here. The tree is expanded as far as necessary. |
| Further processing | |
| : : Advance requirements | - |
| : : : Move selected node in advance | The selected bill of material node is removed from the initial bill of material and attached to a newly created advance requirement item for the same order. In this way components already produced from cancelled order parts lists can be reused for other order items of the same order. See also "release in advance |
| : : : All subnodes of selected node | Not the selected item, but all its sub-items are moved to a preliminary requirement and thus removed from the initial bill of materials. |
| : : Remove | - |
| : : : Complete | The selected BOM item is removed (deleted) together with all subordinate BOM items. If MRP has already been run for the bill of material item, it is not deleted but cancelled. Any goods that have already been removed must then be put back into storage using the"Completion of change management" list. |
| : : : Substructures only | All subordinate parts list items are removed from the selected parts list item onwards. The selected bill of material item itself is retained. If dispositions have already run for the bill of material items, they are not deleted but cancelled. Any goods that have already been removed must then be put back into storage via the"Completion of change management" list. |
| : Open parts list position editing window | Opens the edit mask of the selected exploded BOM item of the target BOM. |
| Target parts list | |
| : Create preliminary requirement for part from selected position | An advance requirement is created for the selected part without moving the parts list item |
| : Show marked position in result list | Selects the entry from the results list that matches the selected target parts list and marks it. In this way it can be checked whether an entry for this item was also an entry in the source parts list or not. |
| Mark found part in original parts list | If the marked part of the target parts list was also found in the source parts list, the part is also marked here. The tree is expanded as far as necessary. |
| : Open parts list position editing window | Opens the edit mask of the selected exploded BOM item of the target BOM. |
| Field | Description |
|---|---|
| Output parts list | - |
| Document history button | Opens the document history of the parts list item selected in the tree |
| Source | The predecessor order item of the bill of material to be compared with another bill of material. This bill of material is regarded as the origin for the comparison. If this bill of material contains parts that are not included in the target bill of material, these parts are considered to be omitted. Any object with an exploded parts list can be dragged into this list with the mouse as a successor. The evaluation is executed via the toolbar button "Start comparison". |
| Parts List Tree | If the evaluation was started, the initial parts list is available in this window as a tree. Using the menu, it is also possible to cancel, remove and move to a preliminary requirement in this parts list. |
| Target parts list | - |
| Document history button | Opens the document history of the parts list item selected in the tree |
| Source | The predecessor order item of the target bill of material, with which the original bill of material is compared. It represents the target state in the comparison. If it contains parts that were not contained in the source BOM, these parts are considered "new". In order to be able to see new parts in the result list, the check mark "New" above the result list must be marked. The evaluation will only be restarted the first time Set and the result will be displayed. Any object with an exploded parts list can be dragged into this list with the mouse as a successor. The evaluation is executed via the toolbar button "Start comparison". |
| Parts List Tree | If the evaluation was started, the target parts list is available in this window as a tree. Via the menu, you can navigate for this bill of material and create a preliminary requirement. A cancellation scenario is not provided for the target parts list. |
| Results | |
| Hide unchanged subheadings | If this check mark is set, all sub-entries of completely found or completely omitted items are removed from the result list. |
| New | If this check mark is set, the result list also displays entries that were only found in the target state list and thus were not present in the source part list. The evaluation of the new entries takes a little longer, therefore it is deactivated as standard option |
| Found | If this check mark is set, all entries are displayed in the result list which are available in both the original and the target state parts list. |
| Dropped | If this check mark is set, parts of the source parts list are displayed in the result list which are no longer present in the target parts list. |
| List | list of results. It shows all results of the comparison of the two exploded parts lists which can be filtered by option. This list can be copied to the clipboard via the toolbar button "Copy to clipboard" and exported to Excel. |
| Status bar | |
| : Analysis as a tree | Opens the entire initial bill of materials as a tree containing only the results of the comparison. In this tree you can see exactly under which component parts have been added or removed. See also tree view |
Toolbar
| Symbol | Description |
|---|---|
| Start comparison - Starts the comparison between the exploded parts lists of both selected order items. The result is entered in the result list | |
| Copy the results list to the clipboard. Opens the copy window, in which a report for printing can also be created/selected. |
Parts list comparison - Options
Via this option window, advanced settings for the parts list comparison can be made.
| Option | Description |
|---|---|
| Depth | Parts lists are only compared up to the depth defined here. |
| Disable attribute value comparison | With this option, identical variant parts are regarded as already found BOM items, regardless of the characteristics in the two BOM items. If the values differ, this is indicated in the result. |
Tree view of the comparison results
| Entry | Description |
|---|---|
| Display sub-items of the selected list item | From the currently selected result list entry, all directly subordinate result list entries are displayed in the list. |
| Entry | Description |
|---|---|
| List | The result list, which contains only the desired entries. When you double-click on an entry, it is displayed in the adjacent tree |
| tree view | The tree view of the desired result entries. Here you can clearly see which entries are new and which are omitted. |
Related topics
- Index
- Work plan
- Test resolution
- Parts list
- Conversion parts lists
- Supplies
- Extended workbench - External work sequences
Technical documentation
Overview
Amount Structure
Resolved allocation base module
Module name
resolved.mod
Classes
Security
In addition to restricting access rights via the class and its data fields, the module can be restricted in its use via some of the received messages.
| Message | Parameters | Function | Security |
|---|---|---|---|
| RESOLVED_ALLOCATION_CHANGED | Resolved Allocation Object | Dissolved allocation was changed | |
| RESOLVED_ALLOCATION_CREATED | Resolved Allocation Object | Resolved allocation was generated | |
| RESOLVED_ALLOCATION_DELETED | Resolved Allocation Object | Resolved allocation was deleted |
| Message | Parameters | Function | Receiver module |
|---|---|---|---|
| EDIT_RESOLVED_ALLOCATION | NULL or Resolved Allocation Object | Call up the input window for exploded allocation | Resolved Allocation Editing Module |
Resolved Allocation Editing Module
Module name
resoledt.mod
Classes
Security
In addition to restricting access rights via the class and its data fields, the module can be restricted in its use via some of the received messages.
| Message | Parameters | Function | Security |
|---|---|---|---|
| ATTRIBUTE_SELECTED | |||
| COMMENT_CHANGED | Object | Comment has been changed | |
| EDIT_RESOLVED_ALLOCATION | NULL or Resolved Allocation Object | Call up the input window for exploded allocation | |
| EDIT_RESOLVED_ALLOCATION_ENTRY | |||
| LIST_RESOLVED_ALLOCATION | Collection Resolved Allocation Objects or NULL | Call up list window for exploded allocation | |
| LOAD_RESOLVED_ALLOCATION | Import exploded allocation | ||
| RESOLVED_ALLOCATION_CHANGED | Resolved Allocation Object | Dissolved allocation was changed | |
| RESOLVED_ALLOCATION_CREATED | Resolved Allocation Object | Resolved allocation was generated | |
| RESOLVED_ALLOCATION_DELETED | Resolved Allocation Object | Resolved allocation was deleted | |
| RESOLVED_ALLOCATION_ENTRY_CHANGED | |||
| RESOLVED_ALLOCATION_INSERTED |
| Message | Parameters | Function | Receiver module |
|---|---|---|---|
| ASK_YES_NO | |||
| EDIT_COMMENT | Object | Open the input window for comments | Comment editing module |
| EDIT_RESOLVED_ALLOCATION | NULL or Resolved Allocation Object | Call up the input window for exploded allocation | Resolved Allocation Editing Module |
| EDIT_RESOLVED_ALLOCATION_ENTRY | |||
| LIST_RESOLVED_ALLOCATION | Call up list window for exploded allocation | Resolved Allocation Editing Module | |
| RESOLVED_ALLOCATION_CHANGED | Resolved Allocation Object | Resolved allocation was changed | |
| RESOLVED_ALLOCATION_CREATED | Resolved Allocation Object | Resolved allocation was generated | |
| RESOLVED_ALLOCATION_DELETED | Resolved Allocation Object | Resolved allocation was deleted | |
| RESOLVED_ALLOCATION_ENTRY_CHANGED | |||
| SELECT_ATTRIBUTES | |||
| SELECT_PRODUCT | |||
| SHOW_PREVIEW | Widget | Print Preview | Print Preview |
| SHOW_TXN_HISTORY |
Exploded parts list editing module
Module name
resolbom.mod
Classes
Security
In addition to restricting access rights via the class and its data fields, the module can be restricted in its use via some of the received messages.
| Message | Parameters | Function | Security |
|---|---|---|---|
| ATTRIBUTE_SELECTED | |||
| BILL_OF_MATERIAL_SELECTED | |||
| COMMENT_CHANGED | Object | Comment has been changed | |
| EDIT_RESOLVED_ALLOCATION | NULL or Resolved Allocation Object | Call up the input window for exploded allocation | |
| EDIT_RESOLVED_ALLOCATION_ENTRY | |||
| EDIT_RESOLVED_BOM | |||
| EDIT_RESOLVED_BOM_ENTRY | |||
| ITEM_SELECTED | |||
| LIST_RESOLVED_ALLOCATION | Collection Resolved Allocation Objects or NULL | Call up list window for exploded allocation | |
| LOAD_RESOLVED_ALLOCATION | Import exploded allocation | ||
| RESOLVED_ALLOCATION_CHANGED | Resolved Allocation Object | Dissolved allocation was changed | |
| RESOLVED_ALLOCATION_CREATED | Resolved Allocation Object | Resolved allocation was generated | |
| RESOLVED_ALLOCATION_DELETED | Resolved Allocation Object | Resolved allocation was deleted | |
| RESOLVED_ALLOCATION_ENTRY_CHANGED | |||
| RESOLVED_ALLOCATION_INSERTED | |||
| RESOLVED_BOM_ENTRY_CHANGED |
| Message | Parameters | Function | Receiver module |
|---|---|---|---|
| ASK_YES_NO | |||
| EDIT_COMMENT | Object | Open the input window for comments | Comment editing module |
| EDIT_RESOLVED_ALLOCATION | NULL or Resolved Allocation Object | Call up the input window for exploded allocation | Resolved Allocation Editing Module |
| EDIT_RESOLVED_ALLOCATION_ENTRY | |||
| EDIT_RESOLVED_BOM_ENTRY | |||
| LIST_RESOLVED_ALLOCATION | Call up list window for exploded allocation | Resolved Allocation Editing Module | |
| RESOLVED_ALLOCATION_CHANGED | Resolved Allocation Object | Resolved allocation was changed | |
| RESOLVED_ALLOCATION_CREATED | Resolved Allocation Object | Resolved allocation was generated | |
| RESOLVED_ALLOCATION_DELETED | Resolved Allocation Object | Resolved allocation was deleted | |
| RESOLVED_ALLOCATION_ENTRY_CHANGED | |||
| RESOLVED_BOM_ENTRY_CHANGED | |||
| SELECT_ATTRIBUTES | |||
| SELECT_BILL_OF_MATERIAL | |||
| SELECT_ITEM | |||
| SELECT_PRODUCT | |||
| SHOW_PREVIEW | Widget | Print Preview | Print Preview |
| SHOW_TXN_HISTORY |
Resolved work plan Editing module
Module name
resoljob.mod
Classes
Security
In addition to restricting access rights via the class and its data fields, the module can be restricted in its use via some of the received messages.
| Message | Parameters | Function | Security |
|---|---|---|---|
| ATTRIBUTE_SELECTED | |||
| COMMENT_CHANGED | Object | Comment has been changed | |
| EDIT_RESOLVED_ALLOCATION | NULL or Resolved Allocation Object | Call up the input window for exploded allocation | |
| EDIT_RESOLVED_ALLOCATION_ENTRY | |||
| EDIT_RESOLVED_JOB | |||
| EDIT_RESOLVED_JOB_ENTRY | |||
| LIST_RESOLVED_ALLOCATION | Collection Resolved Allocation Objects or NULL | Call up list window for exploded allocation | |
| LOAD_RESOLVED_ALLOCATION | Import exploded allocation | ||
| RESOLVED_ALLOCATION_CHANGED | Resolved Allocation Object | Dissolved allocation was changed | |
| RESOLVED_ALLOCATION_CREATED | Resolved Allocation Object | Resolved allocation was generated | |
| RESOLVED_ALLOCATION_DELETED | Resolved Allocation Object | Resolved allocation was deleted | |
| RESOLVED_ALLOCATION_ENTRY_CHANGED | |||
| RESOLVED_ALLOCATION_INSERTED | |||
| RESOLVED_JOB_ENTRY_CHANGED | |||
| WORK_STATION_SELECTED |
| Message | Parameters | Function | Receiver module |
|---|---|---|---|
| ASK_YES_NO | |||
| EDIT_COMMENT | Object | Open the input window for comments | Comment editing module |
| EDIT_RESOLVED_ALLOCATION | NULL or Resolved Allocation Object | Call up the input window for exploded allocation | Resolved Allocation Editing Module |
| EDIT_RESOLVED_ALLOCATION_ENTRY | |||
| EDIT_RESOLVED_JOB_ENTRY | |||
| LIST_RESOLVED_ALLOCATION | Call up list window for exploded allocation | Resolved Allocation Editing Module | |
| RESOLVED_ALLOCATION_CHANGED | Resolved Allocation Object | Resolved allocation was changed | |
| RESOLVED_ALLOCATION_CREATED | Resolved Allocation Object | Resolved allocation was generated | |
| RESOLVED_ALLOCATION_DELETED | Resolved Allocation Object | Resolved allocation was deleted | |
| RESOLVED_ALLOCATION_ENTRY_CHANGED | |||
| RESOLVED_JOB_ENTRY_CHANGED | |||
| SELECT_ATTRIBUTES | |||
| SELECT_PRODUCT | |||
| SELECT_WORK_STATION | |||
| SHOW_PREVIEW | Widget | Print Preview | Print Preview |
| SHOW_TXN_HISTORY |
Resolved Allocation Selection Module
Module name
resolsel.mod
Classes
Security
In addition to restricting access rights via the class and its data fields, the module can be restricted in its use via some of the received messages.
| Message | Parameters | Function | Security |
|---|---|---|---|
| RESOLVED_ALLOCATION_CHANGED | Resolved Allocation Object | Dissolved allocation was changed | |
| RESOLVED_ALLOCATION_CREATED | Resolved Allocation Object | Resolved allocation was generated | |
| RESOLVED_ALLOCATION_DELETED | Resolved Allocation Object | Resolved allocation was deleted | |
| SELECT_RESOLVED_ALLOCATION | Collection Resolved allocation objects or NULL, recipient of the response | Call up the selection window for exploded allocation |
| Message | Parameters | Function | Receiver module |
|---|---|---|---|
| EDIT_RESOLVED_ALLOCATION | NULL or Resolved Allocation Object | Call up the input window for exploded allocation | Resolved Allocation Editing Module |
| RESOLVED_ALLOCATION_SELECTED | Resolved allocation object, receiver | Resolved allocation was selected |
;)
;)
;)